
I develop mainly with Drupal and PHP 7.1 seems to be widely supported and stable version to use. However, Linux Mint 19 comes with PHP 7.2 by default in their apt repository.
So how do we get around this and install PHP 7.1 instead? we need to add the repo which contains PHP 7.1
This is a tutorial to install LAMP server and using PHP 7.1, not 7.2
Install Apache2 web server
Open a terminal and run this command:
sudo apt update
sudo apt install apache2
Once you have completed the installation, run:
sudo systemctl start apache2.service
If you prefer to have Apache2 service to always startup when the server boots up, run this command:
sudo systemctl enable apache2.service
Configure Apache2
Open up conf file:
sudo nano /etc/apache2/conf-enabled/security.conf
Comment out ServerTokens OS and add ServerTokens Prod, as shown below:
#ServerTokens Minimal
#ServerTokens OS
#ServerTokens Full

 ServerTokens Prod
Next, configure the default DirectoryIndex directives.
sudo nano /etc/apache2/mods-enabled/dir.conf
Remove what you don't need so it looks like this:
<IfModule mod_dir.c>
DirectoryIndex index.html index.php index.htm
</IfModule>
After that restart Apache2:
sudo systemctl restart apache2
Install MariaDB (mySQL replacement)
Run this command:
sudo apt install mariadb-server mariadb-client
After installing, the commands below can be used to stop, start and enable MariaDB service to always start up when the server boots.
sudo systemctl stop mariadb.service
sudo systemctl start mariadb.service
sudo systemctl enable mariadb.service
Run the commands below to secure MariaDB server by creating the root user password and deleting the test database.
sudo mysql_secure_installation
When prompted, answer the questions below by following the guide.
- Enter current password for root (enter for none): Just press the Enter
- Set root password? [Y/n]: Y
- New password: Enter your password
- Re-enter new password: Repeat your password
- Remove anonymous users? [Y/n]: Y
- Disallow root login remotely? [Y/n]: Y
- Remove test database and access to it? [Y/n]: Y
- Reload privilege tables now? [Y/n]: Y
Restart MariaDB server when done, using the command below.
sudo systemctl restart mariadb.service
Configuring MariaDB Database Server
Your conf file to configure MariaDB is at:
sudo nano /etc/mysql/mariadb.conf.d/50-server.cnf

or

sudo nano /etc/mysql/my.cnf
There's quite a lot regarding the configurations so i'll leave it to you. Generally the default settings are enough for test development. However, if you have root access on a production version of MariaDB, then you might want to check out this tips at: https://opensourceforu.com/2017/05/get-best-mariadb-performance-tuning/ Please only update your config file if you know what you are doing.
Don't forget to restart your DB server after changes have been made.
sudo systemctl restart mariadb.service
Install PHP 7.1 And Related Modules
Currently in the default repository for Linux Mint 19, only PHP 7.2 exist. But we don't want this newer version. So to overcome this, we need to add a 3rd party repository which has PHP 7.1.
Run the commands below to add the below third party repository to upgrade to PHP 7.1
sudo apt-get install software-properties-common
sudo add-apt-repository ppa:ondrej/php

sudo apt update
Run the commands below to install PHP 7.1 and related modules
sudo apt-get install php7.1 libapache2-mod-php7.1 php7.1-mcrypt php7.1-cli php7.1-xml php7.1-zip php7.1-mysql php7.1-gd php7.1-imagick php7.1-recode php7.1-tidy php7.1-xmlrpc php7.1-php-mbstring php7.1-cgi php7.1-common php-pear
(For Linux Mint or any Debian based Linux distro only) If you want to add PECL uploadprogress PHP extension:
sudo apt install php-uploadprogress

systemctl restart apache2
Configure Apache2 PHP Settings
Open PHP Apache2 configuration file by running the commands below
sudo nano /etc/php/7.1/apache2/php.ini
Then edit the file to suit your environments. Scroll down the file line by line and modify the lines for the settings below… always configure an appropriate setting for your environment.
file_uploads = On
allow_url_fopen = On
memory_limit = 256M
upload_max_filesize = 128M
max_execution_time = 360
date.timezone = Europe/London
Note: if you are running Composer, you should update memory_limit to 2000M
Restart Apache2 and PHP 7.1 services
sudo systemctl restart apache2.service
Your Apache web server runs on http://localhost/
Let's test PHP to see if it is working
Apache2 serves any files for your website from /var/www/html directory. So we need to create a file to test PHP settings and see what modules are loaded to use:
sudo nano /var/www/html/phpinfo.php
In this phpinfo file, add:
<?php phpinfo() ;?>
Save the file and open your browser. Type in http://localhost/phpinfo.php in address bar.
This is what you should see in your browser:
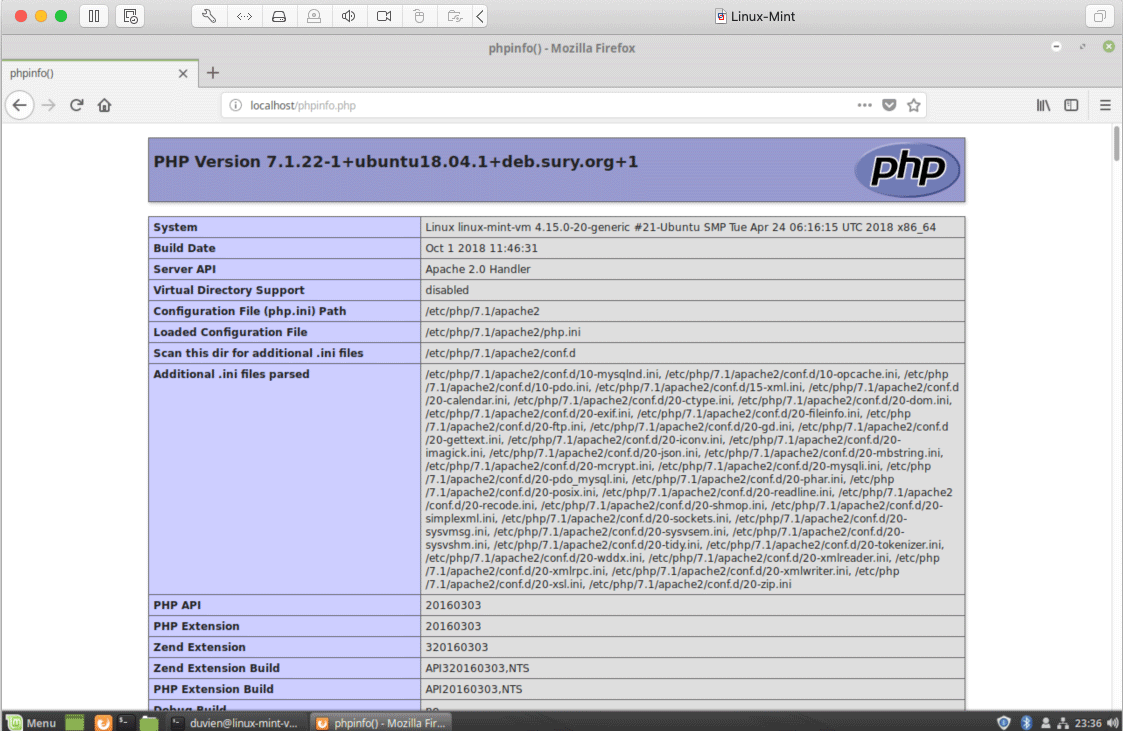
It uses the Ubuntu PHP package. This is because Linux Mint is built from Ubuntu as the base Linux package. So anything that can be installed on Ubuntu should generally work with Linux Mint.
Install PhpMyAdmin
PhpmyAdmin is a web application to manage your SQL DB server via a frontend UI.
To install phpMyAdmin and configure. To do that, run the commands below:
sudo apt-get install phpmyadmin php-mbstring php-gettext
This will open up a dialog to configure phpmyadmin. Select Apache using the space bar key, then tab key to jump to <ok> and click this.
+------------------------+ Configuring phpmyadmin +-------------------------+
 | Please choose the web server that should be automatically configured to
 | run phpMyAdmin.
 |
 | Web server to reconfigure automatically:
 |
 |    [*] apache2
 |    [ ] lighttpd
 |
 |
 |                                 <ok>
 |
 +---------------------------------------------------------------------------+
When prompted again to allow debconfig-common to install a database and configure select No.
After installing, run the commands below to logon to the database server to enable phpMyAdmin root logon.
sudo mysql -u root -p mysql
Then run the commands below
update user set plugin=' 'where user='root';
flush privileges;
exit
Go to your web browser and type in your address bar: http://localhost/phpmyadmin/
You should be presented with this:

Logon with MariaDB or MySQL root account.
And that is it, you have install the LAMP web stack. It does take a lot of time so a better method to get up and running faster and test all kinds of full web stack is to use Docker. Docker is awesome for deploying and testing any mix and match full web stack of your choice contained within a virtual environment on top of any host operating system. I will try and create a tutorial on setting up Docker with Drupal 8.
UPDATE on 12 Oct 2018:
I noticed when you upgrade your system, php7.2-common and php7.2-mbstring packages appear. You can prevent your system from adding/upgrading these packages by putting them on hold. To do this, run:
sudo apt-mark hold php7.2-common php7.2-mb-string
To check the package on hold any time, run this command
sudo dpkg --get-selections | grep "hold"
Later when you do want to upgrade packages you can unhold them by running:
sudo apt-mark unhold php7.2-common php7.2-mb-string
See this article for more details: https://tecadmin.net/exclude-packages-from-apt-upgrade/


- Reply
Permalink