I have a large collection of music which resides on computers in different rooms at home. It was getting annoying when i wanted to listen to a specific track only to realise it was on another computer at home. Then i realise i have an old RaspberryPi 3 (model B) lying around unused for ages. I also have a 1TB USB SSD lying around as well. This SSD was actually meant to be used to store all my music collection but i never really got round to it. So why not have my music collection in a central location where I can access it from any devices (including my iphone). So that got me thinking about some kind of file hosting server (or service).
I began looking at OwnCloud and NextCloud as these platforms kept popping up when it comes to setting up your own file hosting service.
A little history, OwnCloud and NextCloud were build by the same developer (Frank Karlitschek) but because of some kind of dispute between the developer and VCs, the developer left and so did many other members of the original ownCloud team. They forked OwnCloud and named it NextCloud. As time when on, i think both platforms have become slightly different. I decided to go with NextCloud since it seems more in the spirit of open source.
I have looked at many other tutorials and videos on getting NextCloud installed on Raspberry Pi. But it seems cumbersome, you had to install Linux operating system (Raspbian) and then the LAMP stack, libraries and modules. I was feeling lazy and wanted a much faster way to installed and get it up and running. Yes, i could have signup to Dropbox, GoogleDrive or any other file hosting services and be up and running in no time. But this is a tutorial about making use of RaspberryPi. Besides, I like to be in complete control of my own personal music collection.
I did manage to find a time saver, NextCloudPi. Basically, the whole (preconfigured) Nextcloud v21 is contained in the image along with a Linux operating system (Debian Buster), LAMP stack (running PHP 7.3 and including HTTP/2) and Redis server ready to be boot up, and use. To make things even easier, they have added an additional admin web interface to configure a lot of backend functionality such as formatting and mounting USB drives, Samba share and many others (check configuration-reference).
Enough of my rambling, this is how i got Nextcloudpi running on my RaspberryPi.
Hardware:
- Raspberry Pi 3 model B (1GB RAM, only support wifi 2.4Ghz) but you can use any Raspberry Pi 3 or 4 (Nextcloudpi does not work with Raspberry Pi 1 and 2).
- 16GB Sandisk microSD card (larger storage recommended if you only plan on storing all your data on the microSD card)
- 1TB USB SSD drive (optional: only if you want to store your files on an external USB drive connected to RaspberryPi). Note: I will cover this in another article.
You'll also need a monitor, HDMI cable and USB keyboard. This is only for the initial setup. Once you have configured wifi and connected to your network, you can use SSH to connect and complete your configuration from another computer.
Nextcloudpi v1.46.7 installation:
I use MacOS to install and configure Nextcloudpi but it shouldn't be any different for Windows user. I recommend using Putty for SSH on Windows.
First step: make a bootable OS with Nextcloud on the microSD card by downloading an image file and flash it to the microSD card. This image contains everything you need to setup and run Nextcloud on RaspberryPi.
- Download Nextcloudpi at:https://ownyourbits.com/downloads/
- Click on NextCloudPi_RPi_10-08-21 and download the NextCloudPi_RPi_10-08-21.tar.bz2 (Note: the version number may have been updated since this article was written)
- Extract NextCloudPi_RPi_10-08-21.tar.bz2 You should now have an image file (ie, NextCloudPi_RPi_10-08-21.img). If you cannot extract the BZIP2 compressed file, you need to install 7-Zip
- Download Etcher (for MacOS) or download Win32 Disk Manager (for Windows). Follow their guide on how to flash the *.img file onto microSD card from their website.
Once you have created a bootable OS from the image file (which contains both Raspbian (Debian buster) and Nextcloud), carry on with the next step.
Second Step: Booting up Nextcloudpi on the Raspberry Pi
- Insert the flash microSD card into the RaspberryPi
- Connect USB keyboard and HMDI cable to the monitor with RaspberryPi and power on. Another option is to get an ethernet cable and connect the RaspberryPi to your home router so you can SSH and configure your setup. You will need to find out the RaspberryPi IP address. You can use nmap to scan and find the IP of other computers on your network. But for this tutorial we'll stick with using keyboard and monitor (and we'll find the IP address on the RaspberryPi itself).
- When it finishes booting, you will be presented with a screen to enter your password to login.
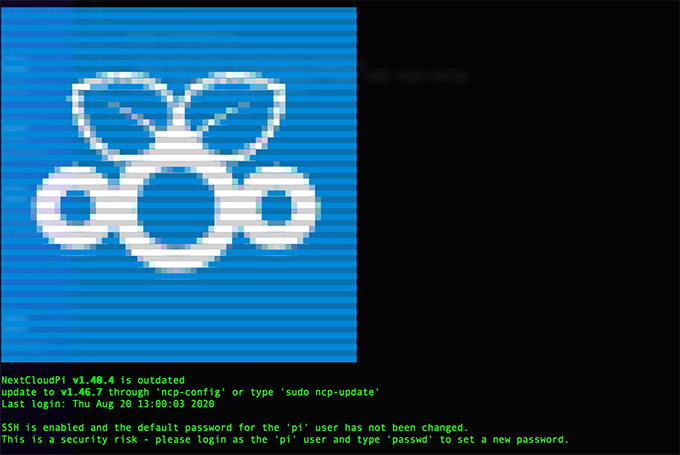 The default user and password are:
user: pi
password: raspberry - First thing, change your password. type in terminal:
passwd - Once you have changed your password, next type:
sudo raspi-config - You will be presented with the configuration tool screen
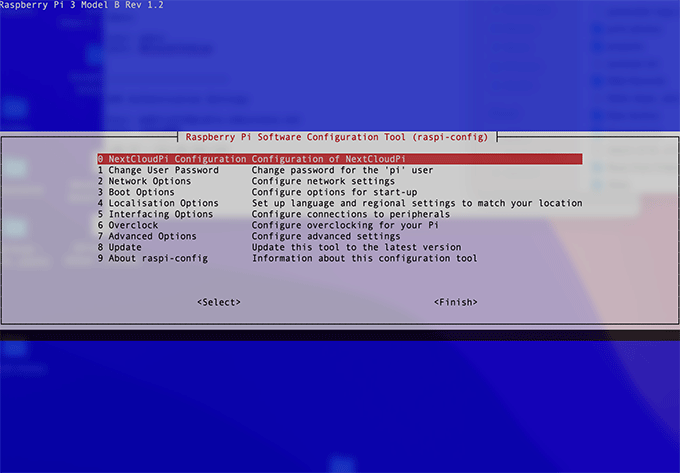
- To navigate the configuration tool dialog, use the arrow keys on your keyboard. To access menu option, press enter key. Use tab key to jump to the bottom selection (such as <yes>, <no>, <select>,<finish>)
- From the configuration tool, select 2 Network options and then select N2 Wireless LAN
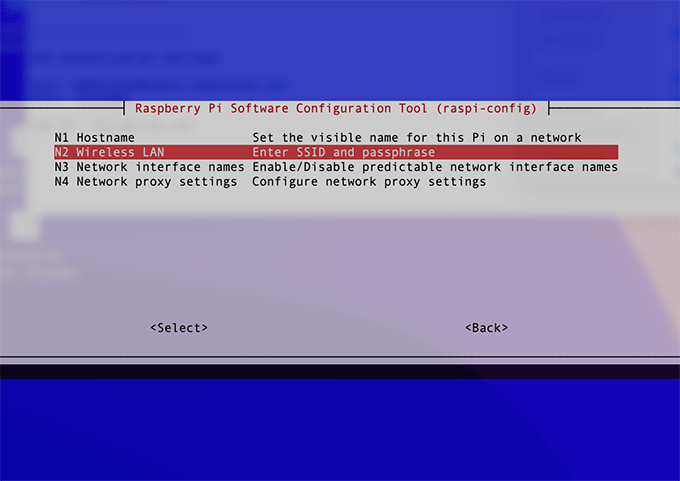
- Enter your Wifi SSID and paraphrase.
- Next, enable SSH so you can remotely access the RaspberryPi from another computer device. To do this, select 5 Interfacing Options and then select P2 SSH. select <yes> and press enter.
- To end raspi-config, select <finish>. This will exit you back into the terminal.
- To SSH to the RaspberryPi, you need to know its IP address. To do this, on the raspberrypi, type in terminal:
This will print out the IP address of the RaspberryPi. Write this down as we will need it later.hostname -I - You can read more about RaspberryPi remote access
- Before we begin to configure Nextcloudpi, it is now probably a good time to run software update to update nextcloudpi. In the terminal, type:
sudo ncp-updateIf there are any new updates for Nextcloudpi, it will fetch and install it.
-
I recommend running updates again since there maybe newer updates for RaspberryPi OS (Debian Buster). In the terminal, type:
sudo apt-get update && sudo apt-get upgradeOnce it has finished updating, reboot your RaspberryPi by typing in the terminal:
sudo reboot -
Once you have rebooted the RaspberryPi and it is back at the login prompt, you can try accessing from a different computer using SSH. To do this, in your Mac terminal (or Putty for Windows), type:
ssh pi@your_raspberrypi_ip_addressReplace your_raspberrypi_ip_address of your RaspberryPi IP address (for example: ssh [email protected]). You will be prompt to enter password once connection is established. Enter your RaspberryPi password.
-
Here is a good tip: your private IP address is usually assigned dynamically by DHCP. This means the IP assigned to a specific devices gets renewed often and you will not be able to connect with same IP so you need to find out what the new assigned IP is to connect to. To get around this, you can create a static IP for your RaspberryPi but a preferred method would be to reserve IP to a specific device so it will not renew the IP address. You can do this on your home router, most modern router will have a feature call something like DHCP reservation, please consult your router's manual.
Final Step: Accessing Nextcould from any web browser
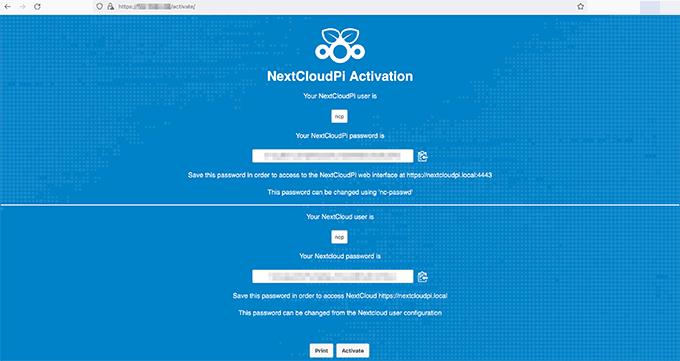
- Open up a web browser (Firefox or Chrome) and type in the address bar:
https://your_raspberrypi_ip_address:4443The first time you access Nextcloud, you will be presented with an activation screen. Nextcloud has 2 different WebGUI. Same admin user but uses different passwords. The first is for system configurations and the second is the Nextcloud frontend admin.
-
Accessing Nextcloud using: https://nextcloudpi or https://nextcloudpi.local will not work unless you are accessing it locally from within the RaspberryPi (not from another computer). Unless you add that entry in your host file. So use Raspberry IP address instead. If you really want to access by using domain, further details can be found at Nextcloudpi website
-
Copy both passwords and keep it somewhere safe for now. You can change your password later. Next click on 'activate' button at the bottom.
-
Your web browser may warn you that you are trying to access an insecure site, you can ignore this warning and continue. If you are using Chrome and you don't see any link to continue, try using your keyboard, type
thisisunsafe. This will add the website to a safe list, where you should not be prompted again. Excellent advice I found at: https://www.technipages.com it was like voodoo.
That is it, you have now got a working Nextcloud running on your RaspberryPi. You can now go configure your Nextcloud. Nextcloudpi documentation is well documented. You can find out what each configuration are and what they do at Configuration-Reference.
You should also refer to Nextcloud documentation as well.
Conclusion: Nextcloud is more than just a file hosting server, it allows for a more collaborative ways of sharing files among group of users. But in my case, I just wanted a quick way to host my files and access it from multiple of different devices (PC and mobile). What I don't quite like about Nextcloud is that it is a bit slow at transferring files. Perhaps, it is more to do with my hardware. I run it on a RaspberryPi 3 model B with only 1GB RAM and it only supports wifi 2.4Ghz so maybe it will perform better on a RaspberryPi 4? Nevertheless, i only intend to run it locally at home so it suits my usage.
If you plan on accessing your Nextcloud from outside of your local network (ie, via internet), you will need to connect to your public IP address (use Whatismyip to find your public IP), more info on how to set this up can be found at: https://docs.nextcloudpi.com/en/how-to-access-from-outside-your-network/ I recommend going down the DDNS route because even your public IP changes some time to time. This will ensure you can always connect to the same domain name to access your Nextcloud.
In the next article, i'll explain how to setup an external USB drive to work with Nextcloudpi.